
avg —
Boneless Stuffed Chicken
Instructions
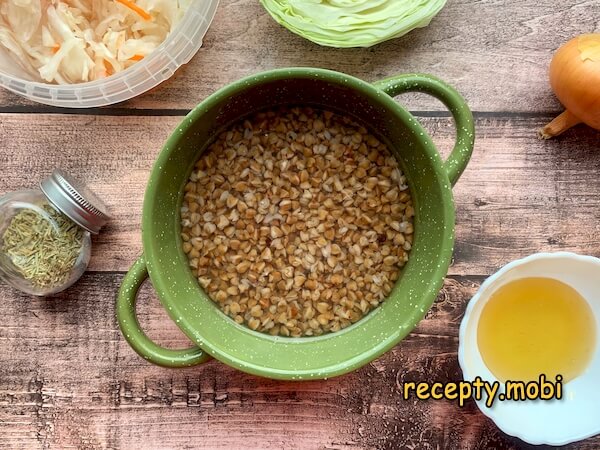
Start with the filling. Pour a glass of boiling water over the buckwheat and leave the bowl covered to swell. The grain should not be cooked through at this point; the half-cooked buckwheat absorbs the surrounding juices and aromas during the long bake inside the chicken, finishing in flavor exactly when the bird itself reaches the perfect doneness on the platter.
Shred the fresh cabbage into thin strips and the onion into half-rings. Heat a wide skillet over medium heat, melt the butter, and add both types of cabbage along with the onion and the rosemary. Cook gently on low heat for about five minutes until the cabbage begins to soften. The cabbage need not finish cooking now; cover the pan to keep it warm because the filling needs to be hot when it joins the buckwheat.
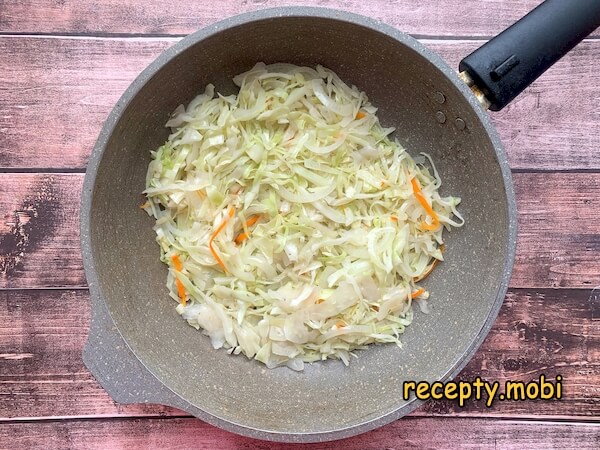
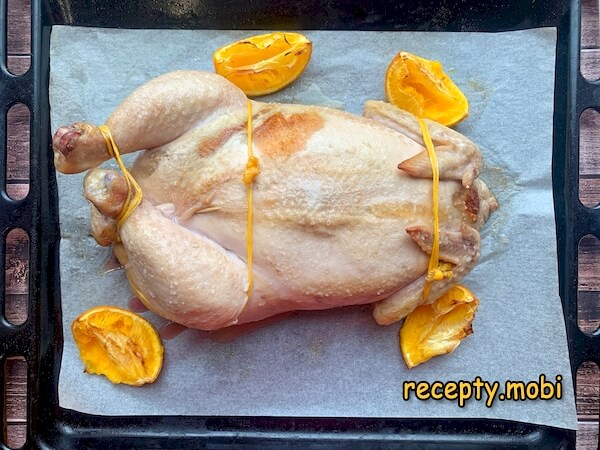
Squeeze the juice from the whole orange straight into the cabbage mixture and stir to combine. Do not add the orange flesh or peel directly to the filling because both add unwelcome bitterness over the long bake. Save the empty peels and place them on the baking tray next to the chicken; they release a beautiful citrus aroma that infuses the bird from the outside while it roasts.

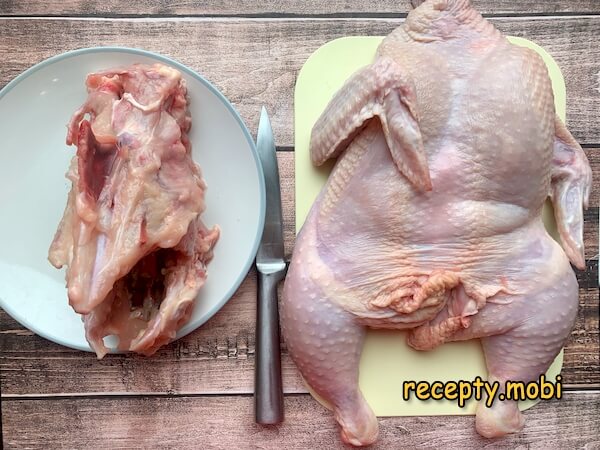
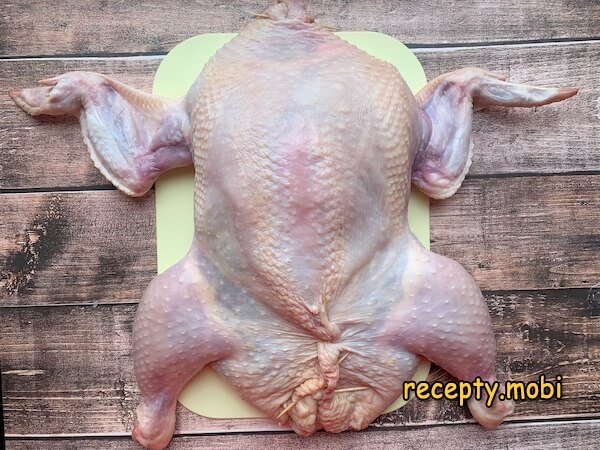
Now turn to the chicken itself. The challenge of this dish lies in removing the bone structure from the bird while leaving the wing and thigh bones intact and the skin in one piece. Start at the back, working with only a very sharp knife. Cut carefully from the keel bone outward, using your hands to assist in the breast area. Separate the shoulder joints, then the thigh joints, work to the back, and finally turn the bird inside out to release the wishbone. Cut off the neck and remove the esophagus. Keep the tail attached because it helps secure the skin during stuffing.
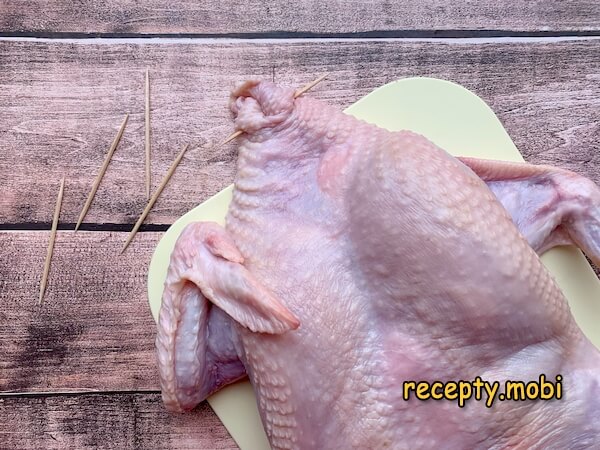
Have very thin skewers or sturdy toothpicks ready next to the boned chicken. Begin by securing the opening at the neck end: pinch a small fold of skin together and pierce it crosswise with a skewer to close the gap. Plain kitchen thread also works perfectly for sewing the skin closed if you prefer that approach to skewers; both methods hold equally well during the long bake.
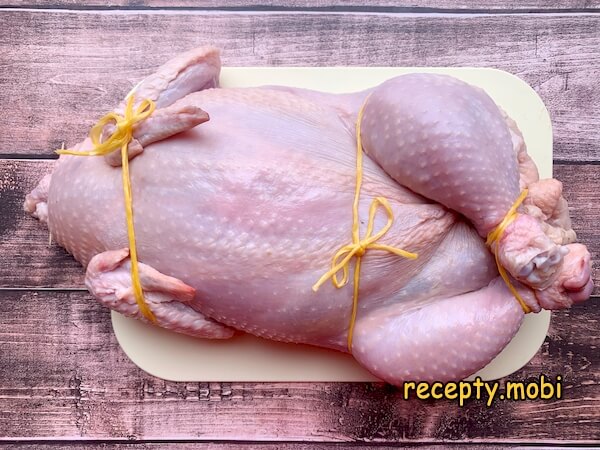
Combine the hot cabbage mixture with the soaked buckwheat in a large bowl, season with pepper, and add salt to taste. Pack this filling firmly inside the chicken cavity, working through the open tail end. Stuff the bird tightly enough that it regains close to its original whole-chicken shape, then close the tail opening with another skin-fold-and-skewer maneuver or a few stitches of thread.
Take a length of cotton string or kitchen twine and tie the wings down against the breast area for a tidy compact shape. Use a second piece of string to bind the legs together at the ankles, then loop the string around the tail and tie the ends together at the belly. The trussed bird looks more attractive on the platter and bakes more evenly than a loose floppy chicken.
Place the trussed chicken on a baking tray and drizzle the surface with the vegetable oil. Sprinkle salt across the skin and rub it in lightly so the seasoning distributes across every part of the bird. Cover the breast loosely with a sheet of foil to prevent the most delicate area from burning, then slide the tray into a preheated oven at one hundred and eighty degrees Celsius on the conventional top-and-bottom heat mode for the first twenty-five minutes.
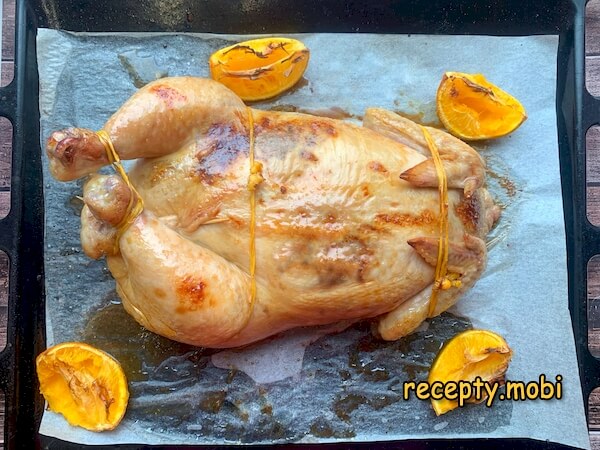
After twenty-five to thirty minutes, pull the chicken out and remove the foil cover. Switch the oven to top heat only. In a small bowl, whisk together the honey and soy sauce until smooth. Brush the entire chicken generously with the glaze and return it to the oven for five to seven more minutes. Pull it back out, brush again with another coat of glaze, and bake for one final five-minute interval to set the deep mahogany color.
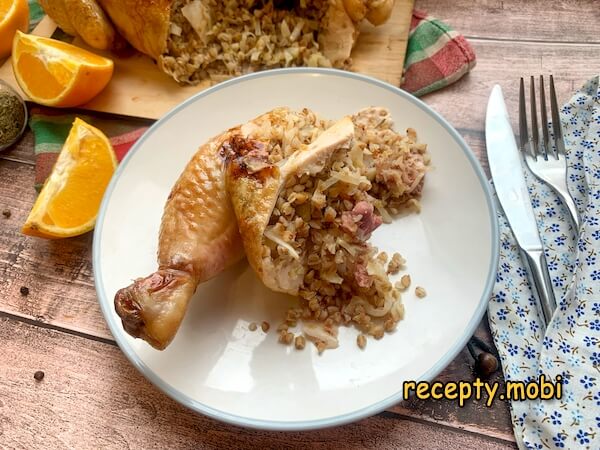
The boneless stuffed chicken is ready to come to the table. Before serving, snip off all the strings and pull out the skewers; the baked bird holds its shape beautifully without any external support thanks to the well-packed filling inside. Carve into thick slices that show off the buckwheat-and-cabbage cross-section, and watch your guests' faces when they bite in and find no bones to push aside. Enjoy your meal.


Tips
- 1
Watch a video tutorial on chicken boning the first time you attempt this recipe. The written instructions cover the steps but the hand-eye coordination of separating the meat from the keel bone is much easier to learn from watching someone do it. Allow extra time for your first attempt; experienced cooks bone a chicken in fifteen minutes, but the first try usually takes twice as long. The skill compounds quickly, and after three or four birds, the boning becomes routine kitchen work like any other.
- 2
Use a kitchen thermometer to check the chicken's doneness rather than relying on visual cues alone. The deepest part of the thigh meat should register seventy-four degrees Celsius for safe consumption, while the stuffing in the cavity should reach the same temperature for food safety reasons. The honey-soy glaze can mask the visual signals of doneness by darkening the surface before the inside is fully cooked, so the thermometer is the only reliable check. For another similarly hearty bird-and-grain pairing, see makhshurda in Uzbek style.
- 3
Save the chicken bones removed during the boning step. Simmer them in a pot of water with onion, carrot, and a few peppercorns for two hours to make a rich chicken stock that you can freeze in cubes for future soups and sauces. Throwing away the bones means losing all the flavor they contain, and a homemade stock from a single chicken provides several weeks of base for cooking projects. The stock keeps for six months in the freezer.
- 4
Let the chicken rest for ten to fifteen minutes after pulling it from the oven before carving. The rest lets the juices redistribute throughout the meat instead of pouring out onto the cutting board the moment you slice. The same rest also lets the buckwheat filling settle and firm up, which produces much cleaner cross-sections when carved. Pair the finished bird with crisp secrets of the most delicious fried potatoes for a classic Russian holiday spread.
FAQ
Can I make this recipe with a turkey instead of a chicken? +
Yes, the technique scales up beautifully for a turkey. Multiply all the filling ingredients by three for a six-kilogram bird and adjust the baking time to about three hours, checking with a thermometer for safe internal temperatures. The boning takes longer because of the larger size, but the visual impact at the table is even more dramatic than with chicken. Cover the breast with foil for the first hour and a half to prevent the leaner meat from drying out before the dark meat finishes cooking.
What can I substitute for the pickled cabbage in the filling? +
Several alternatives work well if pickled cabbage is unavailable in your area. Sauerkraut is the closest direct substitute and adds the same tangy fermented note to the filling. Drain it well and squeeze out excess moisture before adding to the pan; over-wet sauerkraut produces a soggy filling. Finely chopped pickled cucumbers add tang too but with a slightly different flavor profile. For a milder version, use additional fresh cabbage and add a tablespoon of white wine vinegar to the pan along with the orange juice to provide the missing acidic note that balances the rich chicken meat.
How can I tell when the boned chicken is fully cooked through? +
The most reliable indicator is internal temperature checked with a kitchen thermometer. Insert the probe into the thickest part of the thigh meat (avoiding the bones) and look for a reading of seventy-four degrees Celsius. The buckwheat filling should also reach the same temperature for food safety. Visual cues to confirm: the juices run clear when you cut into the leg joint, the skin pulls back from the leg-bone tip, and the chicken feels firm rather than soft. When in doubt, return the bird to the oven for another five minutes.
Can I prepare and stuff the chicken the day before baking? +
Yes, the boned and stuffed chicken can rest in the refrigerator overnight before baking, and many cooks prefer this approach for entertaining because it spreads the work across two days. After stuffing and trussing, place the chicken on a tray, cover loosely with cling film, and refrigerate for up to twenty-four hours. The cold rest lets the flavors meld inside the cavity. Before baking, pull the chicken out of the refrigerator at least one hour ahead so it returns to room temperature; baking from cold adds twenty minutes to the time and risks dry breast meat.
- Comment
or post as a guest
Be the first to comment.
")


