DIY Paskha Molds
When you have nothing to bake your Easter cakes in and you don't feel like running to the shop, a homemade cake mould comes to the rescue. It is so simple to make that it takes very little time, and the materials you need are always around the house.
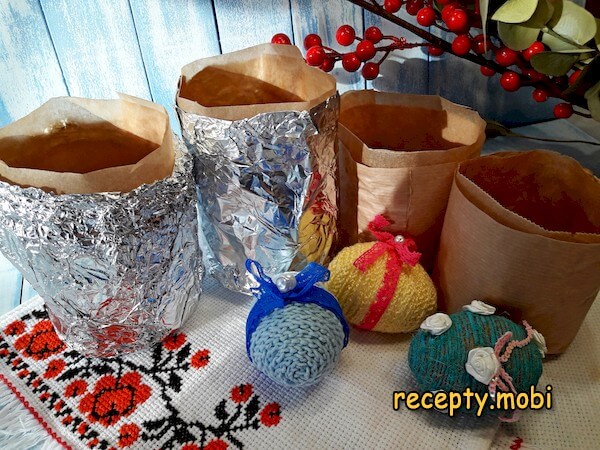
I make Easter cake moulds by hand whenever I have nothing to bake the kulichi in and don't feel like going out to the shops to look for them. They are so simple to make that it doesn't take much time, and the materials you need are always around the house. Below are two methods – one from parchment and one from foil.
What you need for the work
For both versions you will need:
- the cheapest parchment paper;
- good parchment paper with a non-stick coating;
- food-grade foil;
- scissors, pencil, ruler;
- as a base template – a tin can of peas, condensed milk or similar, as well as glass jars of the volume you want (0.5 L or 1 L).
For the flour paste:
- a small metal container for cooking it (a mug or a coffee pot);
- wheat flour – 1 teaspoon;
- water – 40–50 ml.
Preparation step by step
- I gather the necessary tools.

- I also prepare everything for cooking the paste.

- I begin with the edible glue. To make it, I stir the flour and water together in a mug so that no lumps remain.

- I put the mixture over low heat and, stirring constantly, bring it to a thickened state, but do not let it boil.

- Now I need to make the parchment base. For this there is no need to use expensive paper – the most ordinary, cheaper kind will do. First I measure the height of the workpiece, adding another 2 centimetres. I don't cut anything yet, I only make a mark with a pencil.

- With the same paper I wrap the tin can, adding a small 2-centimetre allowance – this will be the length of the workpiece. I make a mark and cut this size straight away.

- I fold the parchment along the mark that indicates the height of the can.

- I cut two strips.

- On an offcut of parchment or on a new sheet I mark out the bottom by tracing its outline around the tin can.

- The bottoms will be double, so for 2 moulds I cut out 4 circles.

- I wrap the cut strip around the can and brush paste onto the allowance, using the back of a spoon.

- I snip the paper edge that sticks out above the top of the template all around its circumference.

- Now I fold it onto the bottom of the can.

- I brush the folded edges with paste and lay a paper bottom circle on top.

- Since the bottom of the tin can is ribbed, it is awkward to smooth the parchment on it. So, if you have a suitable object with a smooth lid and the same diameter (this could be a coffee grinder or some coffee tin), I move the workpiece onto that object and smooth the glued-on bottom well by hand. Although you can try to smooth the parchment carefully on the tin can too. Then I brush it with edible glue.

- I cover the first bottom with a second circle and again smooth everything well. I take the little mould off the template and dry it. This can be done on a radiator or in the sun.

- While the parchment workpieces are drying, you can make the foil moulds. To do this I measure out the amount of foil needed by standing a glass jar so that the foil edges on both sides of the jar are 2 centimetres longer than its height. You need to cut 2 such pieces.

- I fold the foil crosswise and place the jar in the middle.

- I press the foil tightly around the jar and fold the excess height outward.

- You can do it another way – wrap the jar 3 times with foil straight from the roll, then cut the edge and tuck all the excess onto the bottom and press it down well.

- Carefully twisting the jars, I pull them out of the foil. The result is almost-finished moulds.

- Now the workpieces need finishing so that nothing sticks during baking and the moulds are convenient to work with. For this you need liners of good non-stick parchment. I cut out 2 bottoms from it, having first traced the right jar.

- I drop the circles into the finished mould (you can brush on paste so the liner sits neatly in place).

- I measure a strip of parchment for the walls of the mould, making a small 2-centimetre allowance.

- I insert this piece inside the mould. If necessary, I glue it down.

- I make the same liners for all the moulds.
A homemade Easter cake mould made to this size will hold the volume of dough it is meant for. But if the template has a volume of 1 litre or more, you need to take the paper or foil in several layers to reinforce the mould. This way, without spending much time or money, you can make as many Easter moulds of various volumes as you need.


Tips and Tricks
Tip 1. The double bottom is the "secret" of strength. A single bottom will tear under the weight of the dough. A double one holds the cake confidently, even at 1 litre.
Tip 2. Flour paste is the "secret" of safety. PVA glue is not meant for baking. Flour and water make an edible glue that is completely food-safe.
Tip 3. The non-stick liner is the "secret" against sticking. The outer layer is cheap parchment; the inner one is coated. The cake comes away as if from Teflon.
Tip 4. Foil for tall moulds is the "secret" of rigidity. Paper crumples under a litre of dough. Three layers of foil hold their shape like a metal mould.
❓ Frequently asked questions
Which parchment should I choose?
Ideally, two kinds: cheap ordinary parchment for the frame of the mould and non-stick parchment with a silicone coating for the liner. As an alternative, you can use only non-stick parchment (more expensive, but then you don't need separate liners). Do not use waxed paper (it will melt), newspaper (it is unsafe) or printer paper (it is not suitable for food). For a proper mould, food-grade parchment is essential.
What can replace the flour paste?
Alternatives include egg white (1 white), cornflour and water (1 tsp + 50 ml, like the flour version) or potato starch and water (1 tsp + 50 ml). Plain water with flour can be used for gluing in a pinch. Do not use PVA glue, silicone glue or sticky tape, as they are unsafe during baking. For a proper homemade mould, flour paste or egg white is essential.
How long does a homemade mould keep?
In a dry place, in a box, up to 6 months. Any longer and the parchment yellows, the paste dries out and the mould warps. Before use, check that the walls and bottom are intact. A used mould can be rinsed and dried, but the baking quality the second time will be worse (the paper gets damp and loses its rigidity). Ideally, prepare the moulds 1–2 days before baking the kulichi. For each holiday it is better to make new ones – single use is the most reliable.
Which jars work as a template?
Ideally, tin cans from peas, sweetcorn or condensed milk (7–9 cm in diameter). Alternatives are glass jars of 0.5 L or 1 L (9–11 cm in diameter), baby-food jars (6–7 cm – for small cakes) or coffee tins (8–10 cm). Do not use plastic containers (they will melt), dented cans (the mould will come out crooked) or old rusty cans. For a proper result, clean metal or glass containers with even edges are essential.


